How To Add Dropdown Menu To Homestead website

Homestead SiteBuilder is a very popular, easy-to-use website building tool, which allows you to quickly create an entire web site for business or hobby. SiteBuilder includes hundreds of design templates to choose from. You can insert photos, videos, e-commerce capabilities and much more. Unfortunately, SiteBuilder has no such useful component for website navigation, as a dropdown menu.
In this post, I will describe how to add a professional dropdown menu to your Homestead website. Knowledge of HTML, CSS or JavaScript is not required.
As a starting point, I have created a simple website using Homestead SiteBuilder. The site is based on the classic gray colored theme and includes a few pages.
Step #1: Creating the Dropdown Menu
To create a menu, I always use Dropdown Menu Generator - online menu maker which does everything automatically, quickly, easily, and gives out the professional menu which does not require additional customization.
- Setting the appearance of the menu
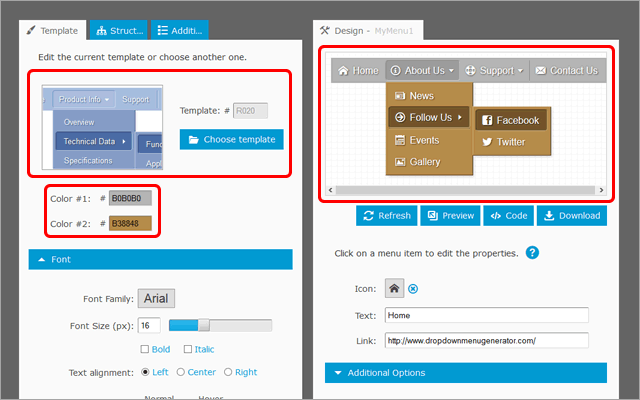
Under the Template Tab, I choose the nice-looking #R020 template with rounded corners, adjust the colors and the font in accordance with the style of my Homestead website.
- Setting the structure
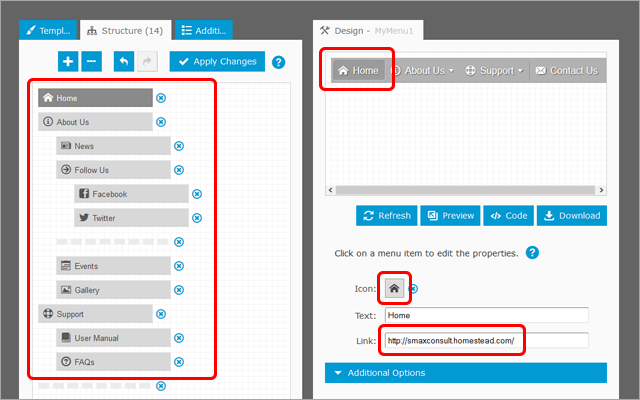
Under the Structure Tab, I define menu elements: Links, Headers, and Separators. The Structure Editor is based on drag-and-drop functionality. It allows to easily create a menu structure displaying multiple levels of hierarchy. For each Link Element, I set the Text and the URL of the page which is the URL I copy from my Homestead site and paste it into the Link field in Menu Generator.
To make the menu more user-friendly, you can use icons. Menu Generator includes general icons (Home, Help, E-mail, etc.), icons for social networking (Facebook, Twitter, etc.), multi-purpose icons (arrows, dots, etc.) and others.
- Setting additional options, getting Embed Code or downloading
Under the Additional Options Tab, I set the width to 100% and center alignment. The menu will be placed on the gray colored bar; so, for a seamless integration, I check the "Transparent menu" option. This option turns off the menu's background.
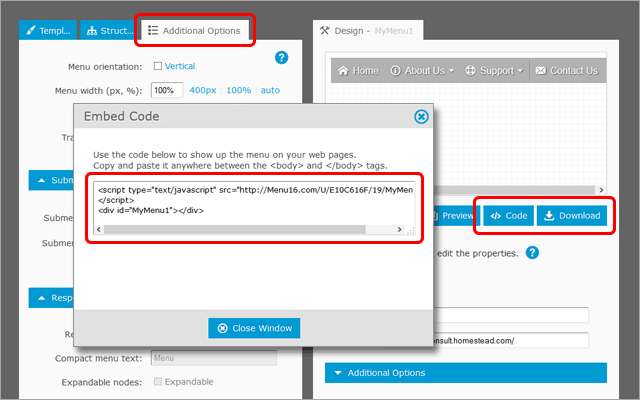
Menu Generator offers menu hosting with Embed Code. It is a very useful feature because any modification made to the menu in Menu Generator will be immediately reflected in the menu on your web pages. If you use Embed Code, you do not need to download your menu and then upload it to your website on Homestead. So, the "Step #2: Uploading the Menu to Homestead website" section can be skipped.
As I do not want to keep my menu on the remote hosting server, I save the menu to my local disk as "MyMenu1.zip" file by clicking on the Download button. The "MyMenu1" is a default name of the menu. Finally, I unzip it to have the "MyMenu1" folder. It includes the main JavaScript file "MyMenu1.js" as well as a few accompanying files. Next, I will upload the menu files to my Homestead website.
Step #2: Uploading the Menu to Homestead website
To upload the menu files to my website, I use Homestead File Manager. To open File Manager, I click the arrow on the right side of the website name, then choose View File Manager.
In File Manager, I create the "MyMenu1" folder (the "New" button) and import the files from the "MyMenu1" directory on my local disk. Finally, I publish the files (via right-click menu).

Step #3: Placing the Menu on the web pages
In the previous step, I have added the menu to my Homestead website. As the menu is now a part of the website, I can to show it up on the pages. All I need now is to add a small HTML code to the page by using the command: Insert -> HTML.
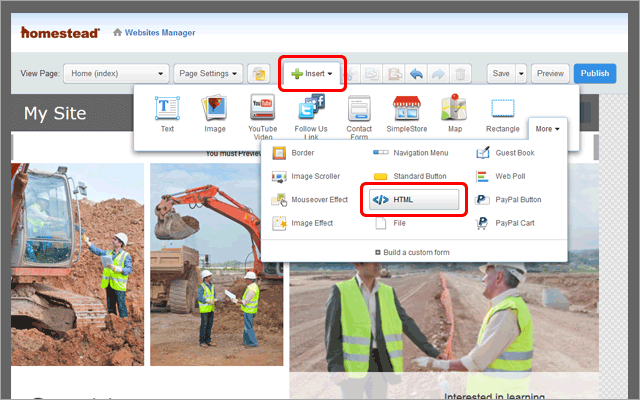
In the dialog box I insert the menu code below:
<script type="text/javascript" src="./MyMenu1/MyMenu1.js"></script>
<div id="MyMenu1"></div>
The menu code consists of the two parts:
- The <script> tag adds a reference to the main JavaScript file "MyMenu1.js".
If the page is located in a subfolder, the src must be with two dots: "../MyMenu1/MyMenu1.js".
-
The <div> tag includes the name of the menu ("MyMenu1") as an identifier (id) and required to show up the menu.
You can also use the Embed Code described in the section "Step #1: Creating the Dropdown Menu".
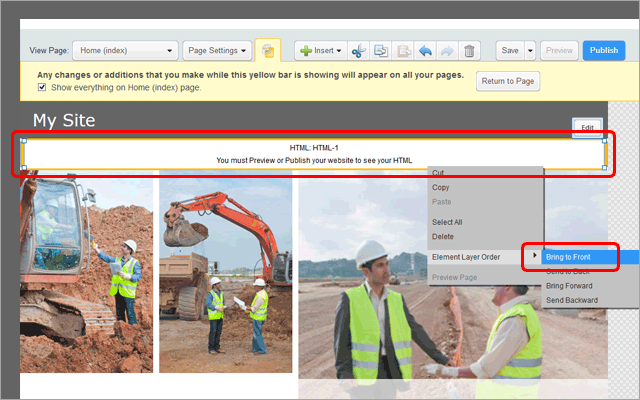
Now the page includes the HTML box which is my new dropdown menu. Next, I bring the HTML box to Front (via right-click menu), drag it to the right place on the page (below the page header), and set the width of the box equal to the width of the site.
That's All! Finally, I publish the website and see the dropdown menu under the header section.

It is important to note that a single menu instance is used for multiple pages of the website. Since a menu is a single folder (the "MyMenu1" in this post), it is enough to replace (re-upload) the current folder with a new one to see an updated menu immediately on every page.
Conclusion
I hope this post will help you to add a dropdown menu to your Homestead website. Please do not hesitate to ask questions.
Links